Authenticating Golang CLI Application Using Keycloak
Have you ever wondered how some CLI applications like Azure cli handle authentication? Or maybe you have a task to implement one at work to your company's CLI tool. Either way, you are in luck since I faced this challenge and wanted to share it. In this blog post I am going to implement authorization code flow with Proof Key for Code Exchange (PKCE) for a CLI application implemented in Go, so lets get started.
Prerequisite
This post is not an in-depth tutorial on how Keycloak or golang works, so it assumes you already have some general knowledge of both.
Setup Keycloak
We will use Docker to run our Keycloak instance. In order to make this happen, we use docker CLI to spawn a new container for us.
Start Keycloak
$ docker run -p 8080:8080 -e KEYCLOAK_ADMIN=admin -e KEYCLOAK_ADMIN_PASSWORD=admin quay.io/Keycloak/Keycloak:25.0.2 start-dev This command will start a new Keycloak container instance, setup an initial password for the admin user, and expose the service from port 8080 on your localhost.
If the container starts without any errors, you should be able to open a browser and navigate to http://localhost:8080/realms/master/.well-known/openid-configuration.
You should see variety of configuration in JSON format. These are your realm's OpenID Connect configurations, which are used, for example, to verify tokens. We will refer to these configurations later.
Master Realm
We'll be using Keycloak's master realm, the default realm created automatically. Realms in Keycloak are separate spaces where you manage users, roles and applications. Our master realm already contains one user, the admin user. For this post, we'll use the admin user to authenticate in our CLI app.
Create OpenID Connect Client
Now that we have Keycloak running, you can open the admin panel at http://localhost:8080. Sign in using the credentials specified in the previous docker run command.
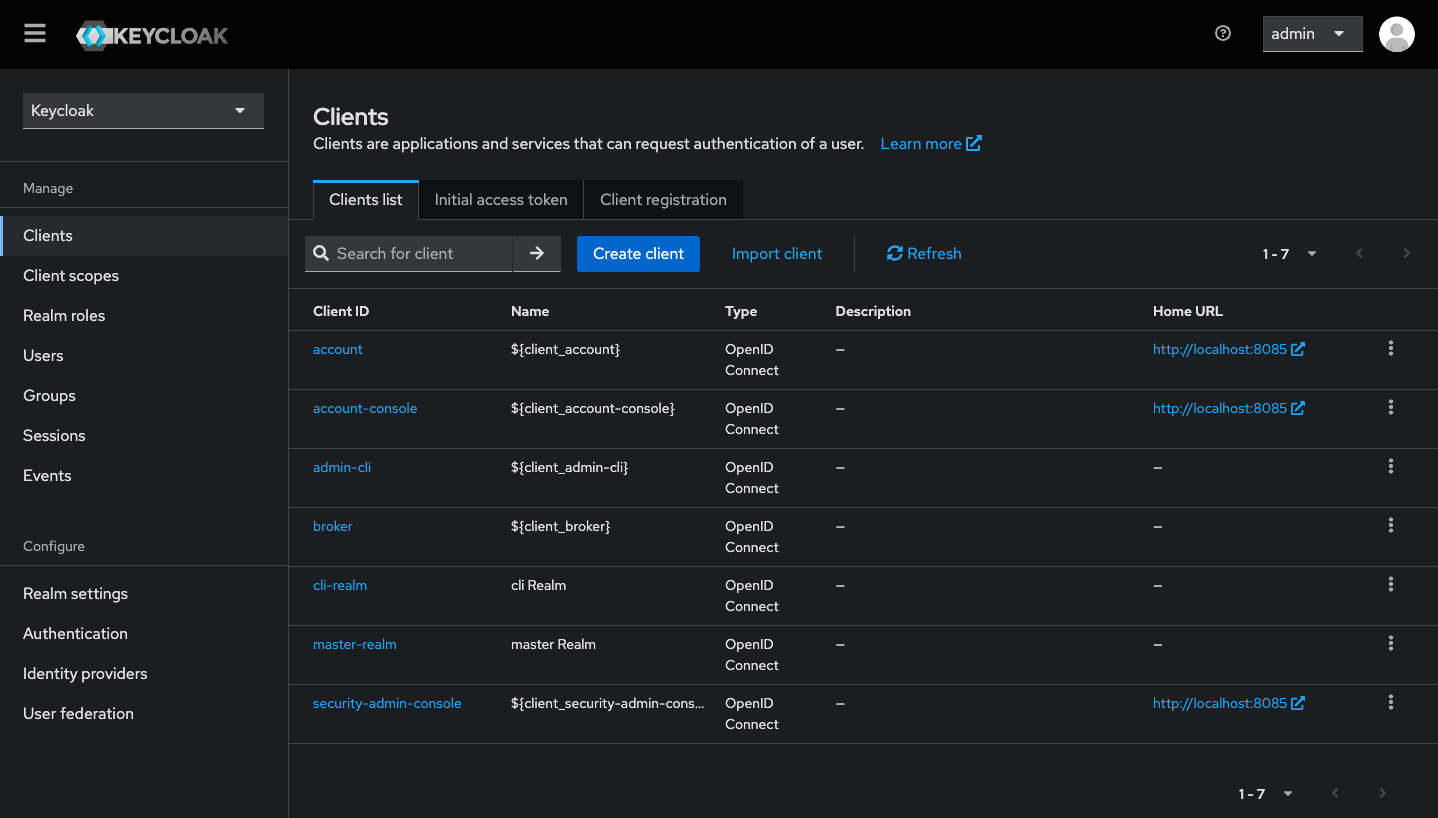
 Keycloak master realm client listing
On the left hand side of the admin panel, select the Clients tab to view a list of clients associated with this realm. Next, click the Create client button and fill out the required information.
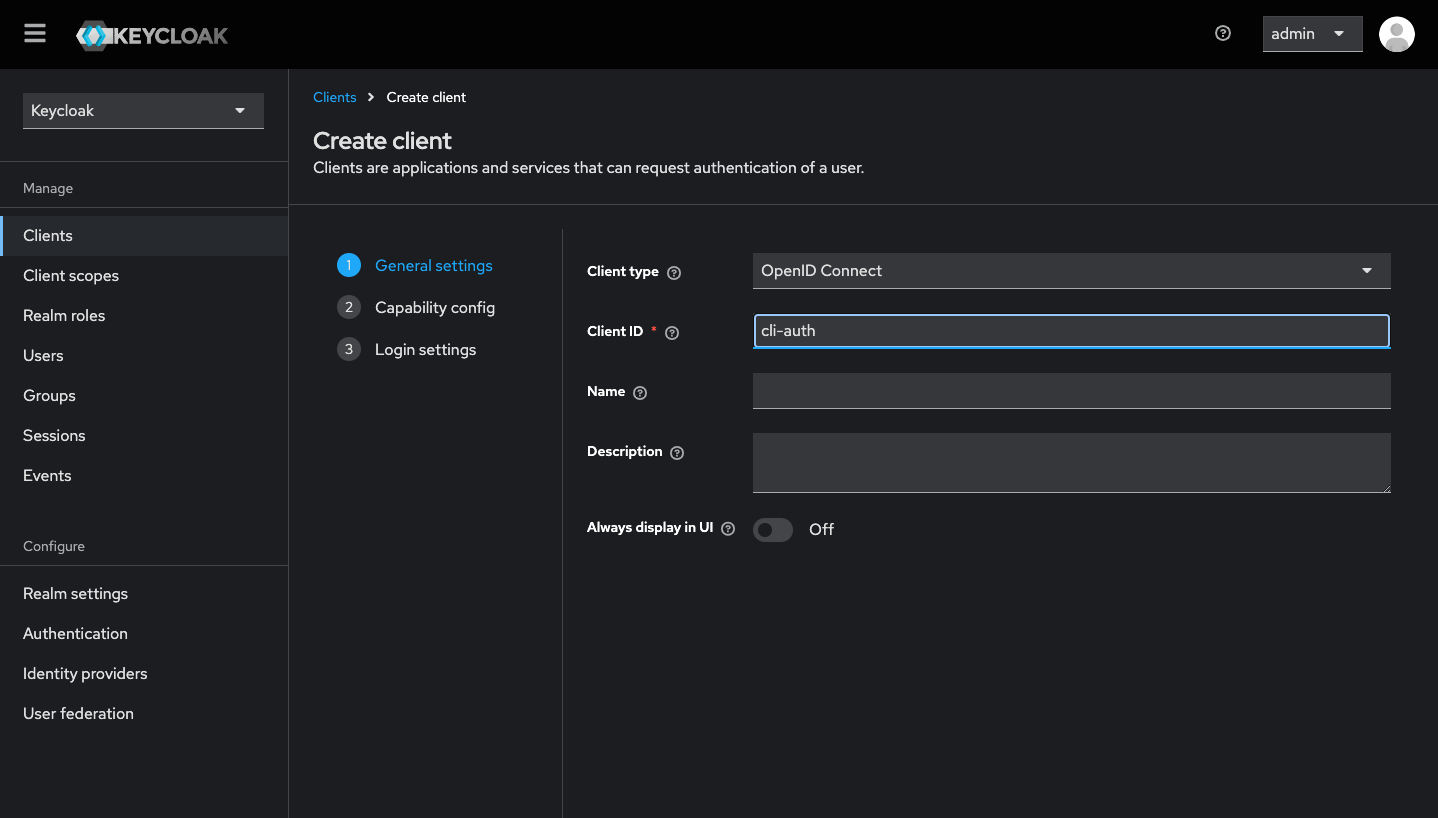
First, choose a name for your client. There's no need to worry about any other settings for now. I am using cli-auth as my client id. Once you're done, just press next
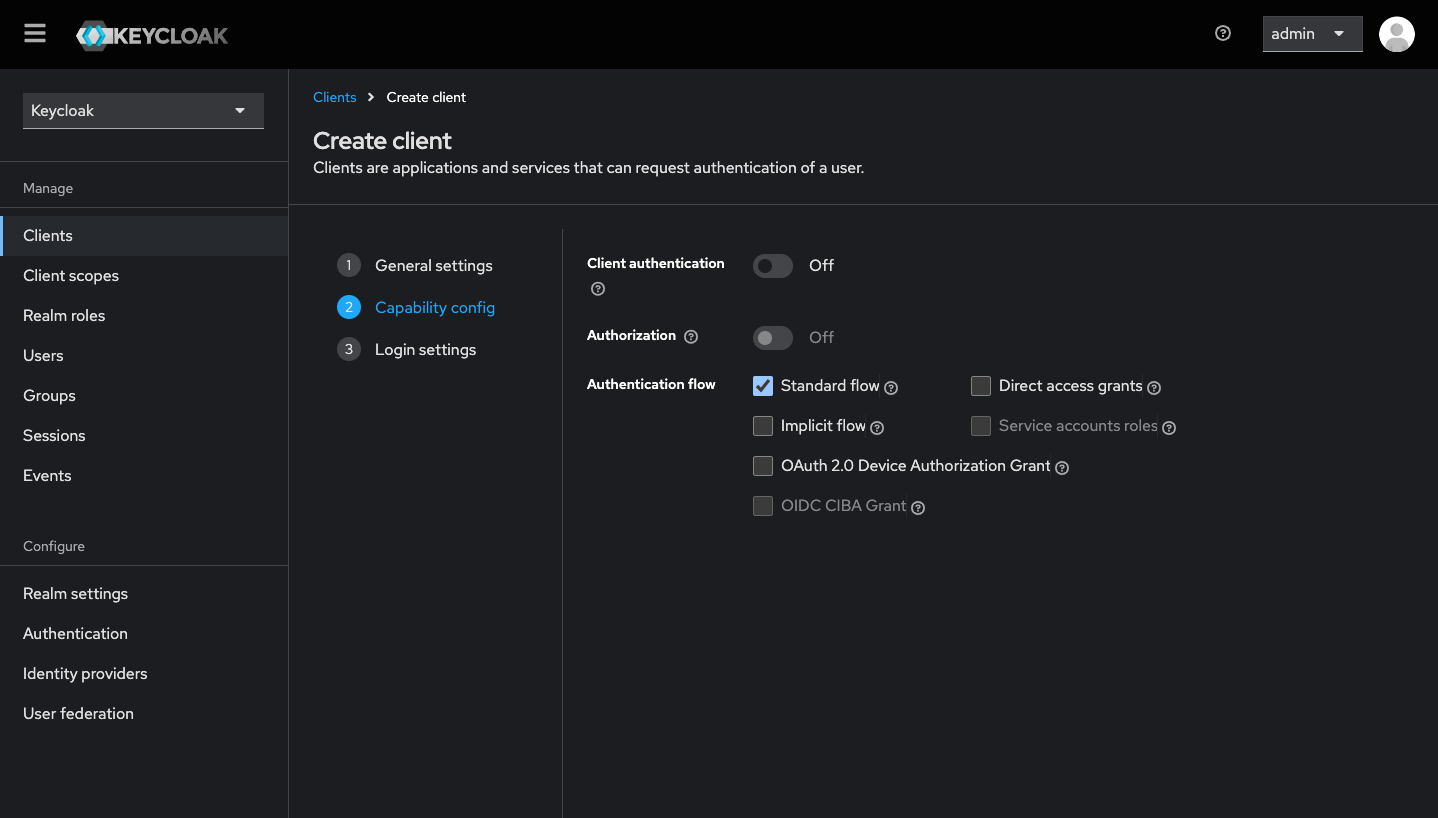
Next we define the capabilities of our client. Since we are using the authorization code flow, select only Standard flow. Press next when done.
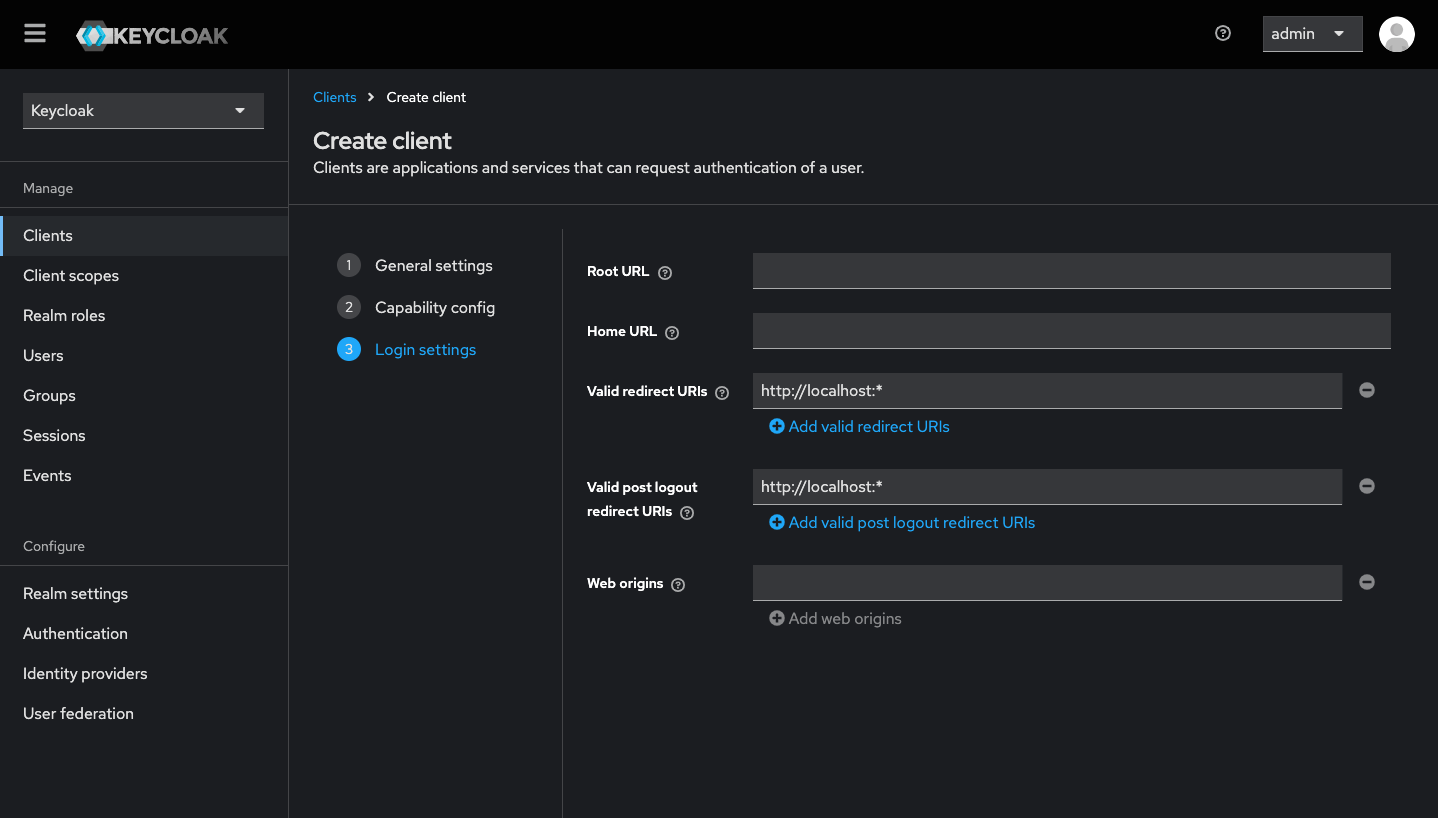
Finally, define the redirect URIs where your client can redirect during the authentication flow. Enter http
We are now ready to save and start using our client.
CLI Application
We can now start working on the CLI application. First, create a new directory for your project and run go mod init. Open the directory in your favourite text editor (I use VS Code) and create a new file named main.go in the root of that directory. Lets begin by creating a basic skeleton for our CLI app.
package main

import (
	"context"
	"fmt"
	"os"
)

const (
	ClientId = "cli-auth"
	Issuer   = "http://localhost:8080/realms/master"
	TokenFile = "token"
)

func main() {
	run(os.Args[1:])
}

func run(args []string) {
	cmd := args[0]
	switch cmd {
	case "auth":
		authenticate()
		break
	case "get-user":
		getUser()
		break
	default:
		fmt.Fprintf(os.Stderr, "invalid command: %s\n", cmd)
		os.Exit(1)
	}
	os.Exit(0)
}

func authenticate() {
	fmt.Printf("authenticating")
}

func getUser() {
	fmt.Printf("getting user info")
}
First, we declare some constants. We set ClientId to match the OIDC client we just created (in my case, the ID was cli-auth). The Issuer is set to point to your master realm. TokenFile is the name of the file that will contain access token.
Ideally, ClientId, Issuer, and TokenFile should be sourced from environment variables or another configuration method. Hardcoding these into the code is generally not recommended, but for the sake of this post, we will proceed this way.
We have a run function that takes a list of arguments. While we could perform the same task in the main function, using run function makes the code more testable since we can't control the parameters of the main function. Inside run function there's a switch statement that acts as an entrypoint to the different CLI features. Our CLI application will support two commands: auth and get-user.
You can already experiment with this code. Run the following command from terminal:
$ go run main.go auth

//should print "authenticating"
Get User Info
Now that we have a basic structure, we can start applying our application logic. We'll begin by focusing on the getUser function, which will provide information about the currently authenticated user. To achieve this, we'll need an access token.
import (
    //...
	"io"
)

//Code omitted for brevity

func getUser() {
	token, err := readTokenFile()
	if err != nil {
		fmt.Fprintf(os.Stderr, "failed to read token: %v\n", err)
		os.Exit(1)
	}
}

func readTokenFile() (string, error) {
	tokenFile, err := os.Open(TokenFile)
	if err != nil {
		return "", fmt.Errorf("failed to open token file: %v", err)
	}
	defer tokenFile.Close()

	bytes, err := io.ReadAll(tokenFile)
	if err != nil {
		return "", fmt.Errorf("failed to read token file: %v", err)
	}
	if len(bytes) == 0 {
		return "", fmt.Errorf("no token found")
	}
	return string(bytes), nil
}
First, we will introduce a new function readTokenFile. This function will read the contents of a text file where we will eventually save our access token. It will return a string and an error. If something goes wrong while reading token file, we will handle the error in our getUser function and exit accordingly.
import (
    //...
	"net/http"
)

//Code omitted for brevity

func getUser() {
    //Code omitted for brevity
	userInfo, err := fetchUserInfo(token)
	if err != nil {
		fmt.Fprintf(os.Stderr, "%v\n", err)
		os.Exit(1)
	}
	fmt.Printf("%s\n", userInfo)
	os.Exit(0)
}

//Code omitted for brevity
func fetchUserInfo(token string) (string, error) {
	req, err := http.NewRequest("GET", fmt.Sprintf("%s/protocol/openid-connect/userinfo", Issuer), nil)
	if err != nil {
		return "", fmt.Errorf("failed to create request: %v", err)
	}
	req.Header.Set("Authorization", fmt.Sprintf("Bearer %s", token))

	client := http.Client{}
	res, err := client.Do(req)
	if err != nil {
		return "", fmt.Errorf("failed to get user info: %v", err)
	}
	defer res.Body.Close()

	bytes, err := io.ReadAll(res.Body)
	if err != nil {
		return "", fmt.Errorf("failed to read response: %v", err)
	}
	content := string(bytes)

	if res.StatusCode != http.StatusOK {
		return "", fmt.Errorf("failed to get user info: [%v] %s", res.StatusCode, content)
	}

	return content, nil
}
Next, we'll create a function called fetchUserInfo, which takes our token as parameter. This function will fetch user-related data from Keycloak. Here we'll refer to the first configuration item from http://localhost:8080/realms/master/.well-known/openid-configuration which is userinfo endpoint. This function will return string and an error, with results handled accordingly in the calling function getUser. If everything goes well, the getUser function should print the user info to the console.
Our get-user functionality is now complete. You can test this, but since we don't have a correct token yet, it will result in an error. Lets move to the authentication part.
Authentication And Getting Access Token
To obtain an access token, we need to authenticate ourselves by providing a username and password to Keycloak. This will involve opening our realm's login page. The authentication process will happen outside of our app, so it won't be responsible of handling any user credentials directly.
We'll begin working our authenticate function and introduce two new functions getAuthUrl and openUrl. Function getAuthUrl will constructing URL with specific query parameters that Keycloak needs to understand our request.
import(
    //...
	"net/url"
	"os/exec"
	"runtime"
)

//Code omitted for brevity

func authenticate() {
	authUrl, err := getAuthUrl("1234", "our_challenge_comes_here")
	if err != nil {
		fmt.Fprintf(os.Stderr, "%v\n", err)
		os.Exit(1)
	}

	err = openUrl(authUrl)
	if err != nil {
		fmt.Fprintf(os.Stderr, "%v\n", err)
		os.Exit(1)
	}
	os.Exit(0)
}

func getAuthUrl(port string, challenge string) (*url.URL, error) {
	u, err := url.Parse(fmt.Sprintf("%s/protocol/openid-connect/auth", Issuer))
	if err != nil {
		return nil, fmt.Errorf("failed to parse url: %v", err)
	}

	q := &url.Values{}
	q.Add("client_id", ClientId)
	q.Add("response_type", "code")
	q.Add("scope", "openid")
	q.Add("redirect_uri", fmt.Sprintf("http://localhost:%s", port))
	q.Add("code_challenge", challenge)
	q.Add("code_challenge_method", "S256")
	u.RawQuery = q.Encode()

	return u, nil
}

func openUrl(u *url.URL) error {
	switch runtime.GOOS {
	case "windows":
		return exec.Command("rundll32", "url.dll,FileProtocolHandler", u.String()).Start()
	case "darwin":
		return exec.Command("open", u.String()).Start()
	case "linux":
		return exec.Command("xdg-open", u.String()).Start()
	default:
		return fmt.Errorf("unsupported platform: %s", runtime.GOOS)
	}
}
Let's first go through the getAuthUrl function. This function constructs our authentication URL using various components. First, we use /auth endpoint from .well-known/openid-configuration that we introduced earlier. Next, we construct a query with several parameters. The function also takes in a port and challenge, but we won't focus on those for now. Here is a breakdown of our query parameters:
- client_id: Tells Keycloak which client to use.
- response_type: Instructs Keycloak on which authorization flow to use.
- scope: Informs Keycloak of the information it needs to provide about the authenticated user.
- redirect_uri: Tells Keycloak where to redirect the browser after successful authentication.
- code_challenge: Instructs Keycloak to use Proof Key for Code Exchange (PKCE) extension for the authorization code flow.
- code_challenge_method Informs Keycloak about the possible hashing function of our code challenge.
Next is the openUrl function, which takes URL as a parameter. This function needs to be aware of operating system since it will execute different command based on it. Fortunately Golang provides this information via runtime.GOOS. We use switch statement on this variable to call system to open a browser with given URL.
Generating Verifier And Challenge
We can now explain the two parameters that our getAuthUrl function takes in. Let's start with the challenge and address the port afterward. We'll introduce two new functions: generateVerifier and generateS256Challenge.
import(
    //...
	cryptorand "crypto/rand"
	"crypto/sha256"
	"encoding/base64"
)

//Code omitted for brevity

func authenticate() {
	verifier, err := generateVerifier()
	if err != nil {
		fmt.Fprintf(os.Stderr, "%v\n", err)
		os.Exit(1)
	}
	challenge := generateS256Challenge(verifier)
	authUrl, err := getAuthUrl("1234", challenge)
    //Code omitted for brevity
}

func generateVerifier() (string, error) {
	bytes := make([]byte, 40)
	_, err := cryptorand.Read(bytes)
	if err != nil {
		return "", fmt.Errorf("failed to generate random bytes: %v", err)
	}
	verifier := base64.RawURLEncoding.EncodeToString(bytes)
	return verifier, nil
}

func generateS256Challenge(verifier string) string {
	hash := sha256.New()
	hash.Write([]byte(verifier))
	challenge := base64.RawURLEncoding.EncodeToString(hash.Sum(nil))
	return challenge
}
Let's first look at the generateVerifier function. Here, we implement what's defined in RFC-7636, which specifies PKCE.
First, we generate an arbitary number of random bytes using Golang's crypto/rand, not math/rand, as the latter is not considered cryptographically secure.
According to section 4.1 of RFC-7636, the code verifier should be high-entropy cryptographic random string. After generating the random bytes, we base64 encode them to ensure URL safety, as required in the same section.
Next is the generateS256Challenge function, which takes our verifier, applies the SHA-256 hashing algorithm, and then base64 encodes the hash. These steps are specified in section 4.2 of the RFC.
Port
Remember when we created our OIDC client in the Keycloak admin UI? We configured valid redirect URIs and defined http
import(
    //...
	mathrand "math/rand"
	"strconv"
)

//Code omitted for brevity...

func authenticate() {
	port := getRandomPort()
    //Code omitted for brevity...
	authUrl, err := getAuthUrl(port, challenge)
    //Code omitted for brevity...
}

func getRandomPort() string {
	pMin := 49152
	pMax := 65535
	p := mathrand.Intn(pMax-pMin) + pMin
	for {
		//check if the port is available
		l, err := net.Listen("tcp", fmt.Sprintf("localhost:%d", p))
		if err == nil {
			l.Close()
			break
		}
		p = mathrand.Intn(pMax-pMin) + pMin
	}
	return strconv.Itoa(p)
}
Pieces are slowly coming together. Here we use math/rand to get a random number between 49152 and 65535. While this might seem a bit random (pun intended), there's a logic behind it.
We're following the guidance on dynamic port ranges provided by the Internet Assigned Numbers Authority (IANA). According to RFC-6335 Section 8.1.2,
ports in this range are reserved for local usage and won't be assigned to anything else by IANA. This means, for example, that if we need a short-lived connection, we can use a port from this range. However, we can't be certain that the randomly selected port isn't already in use locally, so we'll first check if anything is listening on that port before proceeding.
HTTP Server
Next, we'll spin up a HTTP server. With the port already defined, you might see where this is going. We'll introduce two new functions: startHttpServer and callbackHandler.
import(
    //...
	"context"
	"net"
	"sync"
	"time"
)

//Code omitted for brevity...

func authenticate() {
	port := getRandomPort()

	verifier, err := generateVerifier()
	if err != nil {
		fmt.Fprintf(os.Stderr, "%v\n", err)
		os.Exit(1)
	}
	challenge := generateS256Challenge(verifier)

	authUrl, err := getAuthUrl(port, challenge)
	if err != nil {
		fmt.Fprintf(os.Stderr, "%v\n", err)
		os.Exit(1)
	}

	var wg sync.WaitGroup
	ctx, cancel := context.WithCancel(context.Background())
	defer cancel()
	startHttpServer(ctx, &wg, port, verifier)

	err = openUrl(authUrl)
	if err != nil {
		cancel()
		//let's give server some time to shut down gracefully
		time.Sleep(2 * time.Second)
		fmt.Fprintf(os.Stderr, "%v\n", err)
		os.Exit(1)
    }
	wg.Wait()
	os.Exit(0)
}

func startHttpServer(ctx context.Context, wg *sync.WaitGroup, port string, verifier string) {
	ctx, cancel := context.WithCancel(ctx)
	mux := http.NewServeMux()
	mux.Handle("/", callbackHandler(cancel, port, verifier))
	server := &http.Server{
		Addr:    net.JoinHostPort("localhost", port),
		Handler: mux,
	}
	//Start the server
	go func() {
		if err := server.ListenAndServe(); err != nil && !errors.Is(err, http.ErrServerClosed) {
			fmt.Fprintf(os.Stderr, "failed to start server: %v\n", err)
		}
	}()
	wg.Add(1)
	//Handle graceful shutdown
	go func() {
		defer wg.Done()
		<-ctx.Done()
		shutdownCtx, cancel := context.WithTimeout(context.Background(), 1)
		defer cancel()
		if err := server.Shutdown(shutdownCtx); err != nil {
			fmt.Fprintf(os.Stderr, "failed to shutdown server: %v\n", err)
		}
	}()
}

func callbackHandler(stopServer context.CancelFunc, port string, verifier string) http.Handler {
	return http.HandlerFunc(func(w http.ResponseWriter, r *http.Request) {
        //handler logic
	})
}
Right away you'll notice some changes in the authenticate function. These changes revolve around starting and managing a new HTTP server. We create a wait group to manage the server's lifecycle, and we block this goroutine as shown in the second-to-last line of the authenticate function where we call wg.Wait().
The startHttpServer function takes several parameters: context, wait group, port and verifier. We'll first focus on the server's lifecycle management.
The server listens on the port obtained from the getRandomPort function. We start the server in a goroutine and another goroutine to handle graceful shutdown.
The graceful shutdown logic waits until the context is done, which is the crucial part. We also add 1 to our wait group, which the authenticate function waits on, effectively blocking the application until graceful shutdown completes. We call wg.Done() when the graceful shutdown exists.
Some lifecycle management is also handled in the authenticate function. We need to start the HTTP server so it's running before we open browser and begin authentication. If we fail to open browser for some reason, we need to clean up resources and exit, as we cannot proceed with authentication. We use the cancel function of our context to signal the HTTP server to shutdown.
Next we'll look at the callbackHandler logic. We register this function to root path of our ServerMux. Our goal is to receive a code from Keycloak and use it to get the actual access token. We'll introduce two new functions: exchangeCodeForToken and writeTokenToFile
import(
    //...
    "encoding/json"
)
//Code omitted for brevity...

func callbackHandler(stopServer context.CancelFunc, port string, verifier string) http.Handler {
	return http.HandlerFunc(func(w http.ResponseWriter, r *http.Request) {
		defer stopServer()
		code := r.URL.Query().Get("code")
		if code == "" {
			http.Error(w, "code not found", http.StatusUnauthorized)
			return
		}
		token, err := exchangeCodeForToken(code, port, verifier)
		if err != nil {
			http.Error(w, "failed to exchange code for token", http.StatusUnauthorized)
			return
		}
		err = writeTokenToFile(token)
		if err != nil {
			http.Error(w, "failed to write token to file", http.StatusInternalServerError)
			return
		}
		w.WriteHeader(http.StatusOK)
		w.Write([]byte("Authentication successful. You can now close this tab."))
		fmt.Printf("Authentication successful\n")
    })
}

func writeTokenToFile(token string) error {
	tokenFile, err := os.Create(TokenFile)
	if err != nil {
		return fmt.Errorf("failed to create token file: %v", err)
	}
	defer tokenFile.Close()

	if _, err := tokenFile.WriteString(token); err != nil {
		return fmt.Errorf("failed to write token to file: %v", err)
	}
	return nil
}

func exchangeCodeForToken(code string, port string, verifier string) (string, error) {
	q := &url.Values{}
	q.Add("client_id", ClientId)
	q.Add("grant_type", "authorization_code")
	q.Add("code", code)
	q.Add("redirect_uri", fmt.Sprintf("http://localhost:%s", port))
	q.Add("code_verifier", verifier)

	res, err := http.PostForm(fmt.Sprintf("%s/protocol/openid-connect/token", Issuer), *q)
	if err != nil {
		return "", fmt.Errorf("failed to exchange code for token: %v", err)
	}
	defer res.Body.Close()

	bytes, err := io.ReadAll(res.Body)
	if err != nil {
		return "", fmt.Errorf("failed to read response: %v", err)
	}

	if res.StatusCode != http.StatusOK {
		return "", fmt.Errorf("failed to exchange code for token: [%v] %s", res.StatusCode, string(bytes))
	}

	var tokenResp struct {
		AccessToken  string `json:"access_token"`
		IdToken      string `json:"id_token"`
		RefreshToken string `json:"refresh_token"`
	}

	if err := json.Unmarshal(bytes, &tokenResp); err != nil {
		return "", fmt.Errorf("failed to parse response: %v", err)
	}

	return tokenResp.AccessToken, nil
}
We're almost done! Once authentication is successful, Keycloak will redirect the browser to http
In the handler, we first extract the code from the query parameters, which was provided by Keycloak. Then, we use the exchangeCodeForToken function where the actual process takes place.
We construct our request and call the /token endpoint, defined in .well-known/openid-configuration. We include familiar query parameters such as client_id and redirect_uri. Key parameters for our request are grant_type, code and code_verifier.
- grant_type: Informs Keycloak about the authorization flow used to obtain code.
- code: Keycloak uses this to verify the challenge sent earlier.
- code_verifier: Our verifier used by Keycloak to validate the challenge.
After a successful request, we receive a token response containing several tokens. For this post, we're only interested in the access_token.
Finally, we write this token to our token file, completing our authentication process.
Putting It All Together
You should now be able to test our CLI app. Run following command:
$ go run main.go authA new browser tab should open with the login page. Since we are using Keycloak's master realm, you can use the admin account credentials that you used earlier to login to the admin console. If authentication is successful, the browser will redirect, and you should the message "Authentication successful. You can now close this tab."
Great, you now have an access token. Verify that it works by using the CLI application's get-user feature that we implemented earlier.
Run following command:
$ go run main.go get-user You should see a JSON string printed with information about the user and thats it!
Wrap-up
This concludes my blog post on implementing authentication for a CLI application using Keycloak. I hope you learned something new. Please note that some shortcuts were taken for the sake of keeping the post concise. For instance, directly using values from .well-known/openid-configuration and hardcoding them into the codebase is not ideal, as this configuration can change. A better approach would be to fetch the configuration, store it in cache, and implement cache invalidation to periodically refresh the configuration.
Full source code can be found from github, happy coding!


